If you are reading this, then I suppose, you are not a fan of Linux, BSD or MacOS. I wrote a WordPress for Linux installation few months ago, but still friends are asking me “What about Us? We don’t use your strange OS with text mode only! Bleh!”
So I’ve decided to help them too. There are few things you will need to do the installation:
- Install XAMPP or other windows web server.
- Install WordPress.
- Configure MySQL
- Configure WordPress to use your web server and database.
- Write your own first post 😉
How to Install XAMPP
First you need to download XAMPP. Go to their site, download either the archives or the installer and follow their installation instructions. They are quite easy to follow even for non-techies. Next-next-finish. You may like other web servers, but I really suggest this one for the easy installation. It is packed with everything you are going to need for a WordPress clean install.
Read carefully All security measures and precautions in the site. Some of the important passwords are left :blank: by default. You don’t want this!
Launch a browser and enter “localhost” in the address field (without quotes). Choose your preferred language. It will be for the interface only. Have some few minutes to get to know the interface. It is friendly. The only Bug I’ve seen in the installation is – the PHPMyAdmin is set in German by default. If you are quick to go there before setting a password – you will see German interface. To change this. Click on the tab “localhost” above and in “Anzeige-Einstellungen” choose [Sprache – Language] to be English. If you set PhPMyAdmin with password – the login screen will have language selector.
To change default passwords (blank) for the users, you need to choose [Security] from the left menu. There you will see a link sending you to http://localhost/security/xamppsecurity.php. Go there and enter passwords for MySQL root user. The other user and password will protect your local server directory from free access. Don’t forget those passwords and always use GOOD passwords (as in the end of this article for security I wrote).
Go to XAMPP control panel and click [Stop -> Start] on the MySQL server for the new password to take effect. REMEMBER the PhpMyAdmin password.
You are set for now. Now launch another tab/window in the browser and enter http://localhost/index.html in the address field. You are supposed to see the caption “It works!”. If it does not – review the steps so far. You are missing something.
XAMPP is set. Now we need to
Install WordPress
For the purpose of this “How to” – I will be using latest WordPress .org. It is freely downloadable at http://wordpress.org/download/
Get the file and unzip it in a handy folder. Then move the WordPress contents to the “htdocs”, where you installed the XAMPP. It will look like this:
Now the things will become a little bit complicated. You need to know how to edit a .php file with some important data inside. By going to https://127.0.0.1/wordpress/, WordPress installation will reply with:
There doesn’t seem to be a
wp-config.phpfile. I need this before we can get started.Need more help? We got it.
You can create a
wp-config.phpfile through a web interface, but this doesn’t work for all server setups. The safest way is to manually create the file.
You can either click the links and follow instructions or open the sample file and edit it by hand. The file is in X:/xampp/htdocs/wordpress/wp-config-sample.php
Rename the file to wp-config.php and open it in Notepad or other editor, that does NOT put formatting and fonts/sizes/symbols/eyecandies and other useless tags. (Have in mind, that some windows installations will rename the file like this -> wp-config.php.txt when you use “Save-as” in Notepad. The extension must be .php and not .php.txt. Change it accordingly!!! Go to your htdocs/wordpress directory and execute “rename wp-config.php.txt wp-config.php”) There are few lines, that are important in this file:
define('DB_NAME', 'database_name_here');
define('DB_USER', 'username_here');
define('DB_PASSWORD', 'password_here');
define('DB_HOST', 'localhost');
To fill them, we need first to set them in MySQL data base, that will be holding our WordPress articles and pages. Go to the MySQL installation at https://127.0.0.1/phpmyadmin/ and enter your root user and password, that you set earlier and I told you to remember. All important settings are to be done from this admin page before the Blog is set.
 Go to Databases tab and enter new data base name. “wordpress”, “wordpressbase”, or “blogdatabase” are all good names. Click “Create”. PhpMyAdmin will reply that the database is created.
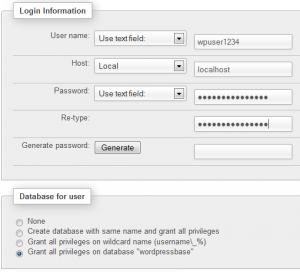
- Now hover on “More” tab and choose “Privileges” -> “Add a new user” and set a name.
- Choose Localhost for a server
- Choose a complex password, that is not easy to guess. This user will have all access to your articles and can destroy and create tables in your database. If unsure WHAT is a complex password -> reread the end lines of this article or create one with “Generate” button. In the last case, it will be a gibberish-ungueassable-very-strong-password, that will be very hard to guess by a malicious software or bad friends.
- Grant all privileges to our new user for table “wordpressbase” or whatever name you have used in step 1.
- Click “Go”.
The data above is important. Needs to be remembered and not written on a paper or a file that will fall in malevolent hands or scripts.
WordPress configuration
is the next step.
Edit the file X:/path/to/xampp/htdocs/wordpress/wp-config.php and enter the data in the config lines I pointed as important, until they look like this:
define('DB_NAME', 'wordpressbase');
define('DB_USER', 'wpuser1234');
define('DB_PASSWORD', '0neExtremelyL0ngBadPassw0rd');
define('DB_HOST', 'localhost');
Mind the bold text. It is only an example and your server may be set to something else. The password is long enough and has digits and caps. SAVE the file and go back to the link https://127.0.0.1/wordpress
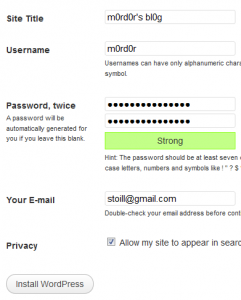
This time, it will not reply you are lacking the file wp-config.php but will show the setup screen with the data needed for installation of the blog itself:
-
Site title. Choose whatever suits you. This will be shown in search engines and as a header above all articles. If you enter “Johny’s blog” and you write article “How to ride a bike”, for the search engine results, your article will be shown as “How to ride a bike >> Johny’s blog”. This values can be changed later, so don’t think too much.
- Your user name. Not “root”, not “wpuser1234”, not some nonsense -> something artistic or your real name. This username will be shown below/above all articles you write (depending on theme). All your comments will be show also with this user name. Choose wisely, because this is your MAIN and Almighty user, that can set everything else in your blog. Giving rights to other users, deleting spam, moderating articles and user comments.
- Good password. Very important. See step 2.
- Your e-mail. It will be used to contact you in case someone needs it. Can be shown or hidden. There are plugins that will send you e-mail and user input without the need to show your e-mail at all.
- Click “Install WordPress”. Wait a bit. Ready ;). WordPress will tell you how disappointed they are, that this install is not more complex 😀 and then allow you to enter the Admin page of your new blog.
- Have a good look in your Dashboard. This is where ALL happens. If already bored to death, click on the upper left corner, where the name of your blog is and click “Visit site”. There is your first blog post saying “Hello world”. Go back to the dashboard from the [Right bottom blog menu -> Meta -> Site admin].
- Your blog is ready. There are few more steps to set, but they will depend on your own installation.
The next steps are strictly depending on your preferences, the domain name you bought, the theme you have chosen to use and the style of your blog.
You need to decide them yourself, and most of them are covered ELSEWHERE. The most important are:
- Dashboard -> Settings -> General. Choose your site name, title, full path to your WP installation, data and hour format for article posts.
- Dashboard -> Settings -> Privacy. Set if your new blog should be indexed by search engines or you are going to advertise it yourself.
- Dashboard -> Settings -> Permalinks. This is important for Search Engine Optimization. Most of the bloggers advice to choose the “Post name” format instead of “Default”.
Again. It is up to you when choosing those settings.
Write your own first post
Ready 🙂 ?!
Go to Dashboard -> Posts -> Add new.
There will be a small dialog with Rich Text Editor inside. Take your time. It’s like opening a document in WordPad. When you decide what to write – get to work. I’ve thought it will be easy, but it took me almost 1 year of experience until I learnt how to write my own articles in my own way.
Few advices:
- Don’t copy&paste articles from Internet.
- Think about what you write. Content is the main and most important thing in your new blog.
- Read articles about blogging. There are 4 main article types. Personal, how to, news and reviews. First, take almost no traffic, How-to’s get good traffic, news get traffic when they are current and reviews are good as long as the article is relevant and new. It is up to you to decide, but believe me – there are TOO MANY personal blogs. I read some of them, but their count is in digits. Stick with the other 3 categories. I know a person that has 5 digits per year in passive income just by writing reviews for a photo materials and tools.
- Don’t use black hat techniques to promote your blog. It takes time to build authority and get backlinks. It is not an overnight job.
- Decide if you are going to monetize your blog. This can be very frustrating but interesting process. Don’t expect “Big money” until you reach at least 1000 visits per day. According to WikiPedia and math statistics -> Conversion goes between 3 and 10 AD clicks on 1000 visits. Don’t expect miracles. Especially if someone told you, that you will get $200 per day from blogging… you may get there … eventually… after some 2-3 years of work. There are no shortcuts. Using forbidden tricks will only get your blog blacklisted and your AD account blocked with all your revenues held. Believe me. You can’t. And if someone promises you to get rich overnight – block him and report him. It’s a scam.
Good luck and welcome to our online family.


Sorry, the comment form is closed at this time.