… I hope you came from level 5 in full health.
You start level 6 with bad fight on your hands.
There will be a bashing Ogre in the hall you will enter. Don’t let him corner you or you are toast.
And not just this but also 3 spiders will come to poison you and stand in your way, so you can’t kite the monster effectively.
Needs some good moves and lots of trial and error.
If you see him running towards you – quickly strafe on any side to avoid the charge attack.
It does very heavy damage.
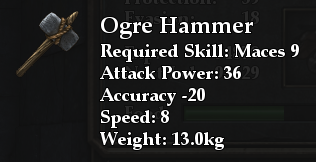
If you manage to kite him down he gives:
- 750 experience
- Ogre hammer
- A bag with food and a gold key which opens the treasure in the end of the level (but has another much clever use!!!)
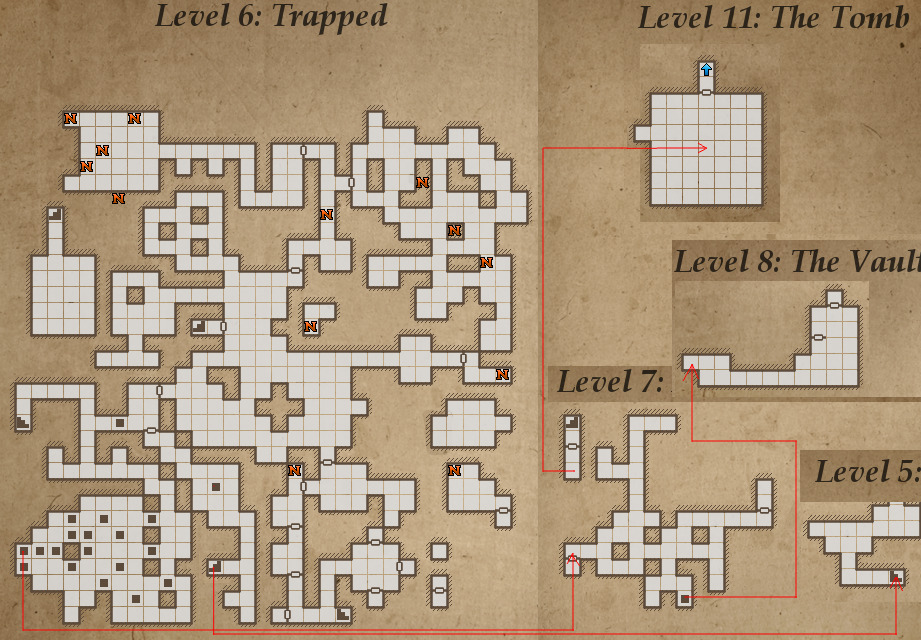
Finish all the spiders, so they don’t stay in the way and have a good look at the main hall. There are some few areas, which you can cleanse in an order you like:
- Spider grotto.
- Walkabout.
- Sequencis.
- Halls of fire.
- Vault of the orb. (Secret).
- Haunted halls and Maze of madness.
Spider grotto.
There is a good sword in the alcove and a chunk of meat.
Few spiders for killing. I suggest you clean this room first, because it does not have door and you may see some loose spiders lurking in the main hall.
Walkabout.
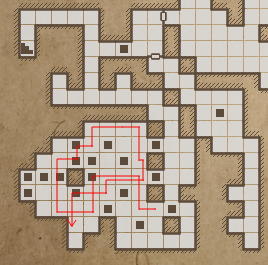
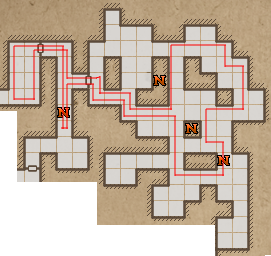
There are 3 places in the area which make clicking sounds.
- Start “walking about” clockwise in the path I’ve provided in the minimap above.
- Keep walking.
- Every few walks, something will appear.
- First it is a stone.
- Second a skeleton pikemen.
- Third a (secret) bag with speed potion and its recipe.
Quite an easy area compared to the other ones. Just one skeleton to kill.
Sequencis.
This area is a bit tricky, but it opens the way to the blue stone, so I recommend taking this area ASAP, so you can use the stone.
Deal with the 2 crabs inside.
Go to the teleporter and enter.
You may need to observe the map.
There will be 4 places in which you will start to teleport quickly and will rotate between them endlessly until you exit the teleporter.
DON’T press the button or a poison cloud will be exhaled from the head.
One of the rooms has a door with a chain for opening.
Behind this door is a snail guarding a switch.
Kill the snail and enter.
Pull the switch and save!
Enter the teleport again.
The Northeast room will have an opened portcullis (by the lever).
There is another crab inside you need to kill and you will find the first round key.
When you return to the Sequencis, there will be another crab infestation in the main hall. Be prepared.
I suggest you open the door with the round key and make your stand there (you can get healing from the blue stone if you are low on health).
Clean the spiders and go to the other areas to collect more round keys.
Halls of fire.
Get the fire bomb and jump in the trap door.
The first trap door leads to next level and you have some flyers to take down.
Few herbs, sandals and a shirt. Some closed door you will open a bit later from the same area.
A scroll saying “WestMost” and another trap door leading even deeper to level 8.
Heal if you need and drop to level 8.
There are some herbs, food and a pressure plate which releases half-dozen bugs for killing.
Behind the bugs there is a small secret room with a good plate helm. +12 AC.
You need to depress the plate from inside the bug room to open the secret. Drop the item on the pressure plate from outside in such a manner which will allow you to take it from inside.
If the plate is not depressed, the secret room will not open.
Get back to level 6 when done with the above.
The room near the trap door has 3 crabs and another trap door which leads you behind the wooden door on next level. It is a secret and gives lurker pants and a throwing star.
After the spiders, in the corridor, there is a pressure plate which starts launching fire balls.
The 2 alcoves in the end of the corridor have The Fire sword but you will take heavy damage if you simply rush in.
A button on the west wall will open a small place for you to hide.
Another button exactly after the pressure plate will open another hiding place.
From the second place, you can hide until the fireball passes and quickly go and loot the 2 alcoves.
Edit: Also from the second place, you will spot a button on the north wall which opens a secret way up to level 5. Go there and collect after you are done with the fire sword. (There will be 2 fire elementals there, but the reward is good. Two plate items. Armor and gloves) Thanks to Orley Lima for pointing that out.
The sword is very important if you don’t have a mage with Fire skill 13. Without fireball, you can’t close the trap door in the beginning of the area (the one claiming this entrance is for Mages).
The sword shoots fireballs when you swing. And the fireball is the only way to close the trap door (you need to shoot fireball towards the head.)
If you don’t have or already spent the sword and can’t cast Fireball – you can’t go there – Halls of fire will be closed to you, but you can still continue the game (with less secrets completed though. Either – return later, when you can cast a fireball or abandon this area.
How to enter?
- Throw an item, so the head spews a fireball and step aside. (If you skip this – pressing the plate later will blow the fireball on you at point-blank).
- Cast fireball or swing the fire sword. The fireball will close the trap door (You didn’t forget to loot it first. Yes?)
North of the head is secret entrance to levels 7 and 11. A place named “Fighter’s challenge”. You still can’t enter it (Needs Vex sword), so leave it for later.
Go into the trap-door room and dispose of the two fire elementals. They are afraind of ice and poison and give 500 XP each, quite good for a monster which is falling fast.
The “Westmost” scroll is a bit cryptic, but it reveals another treasure:
Go to the western part of the level and fall down in the westmost trapdoor. The “Golden grave”. There is a crab which will give you 10 seconds before the door opens.
Hit hard and grab the crown. (3/7 treasures). After you come back in the pit Hall of fire area, 2 more elementals will come.
Dispose of them and focus on the puzzle:
It takes quick moves.
- At first, only one button in the room can be pressed. Press it and run to the column in the center.
- Press the button, quickly go on the other (opposite) side of the column and press the other button.
- Get the round key from the alcove. Once you grab it, another elemental will come. Either shoot it or use a spell.
- REMOVE the torch from the stand and another trap door will close, allowing you to go around for the last button.
Now repeat the whole exercise again, but this time press all the buttons in this order:
- East
- West
- North
- South (see map).
Once done, behind you will open another secret room with another elemental.
He guards a ring mail armor and the Vex sword.
This sword is needed to open the Fighter’s challenge, so don’t throw it away if you don’t use swords in your fighter characters.
Fighter’s challenge
This battle is still a bit hard if you are merely level 10-11, so either risk it or leave it for later. (you will be surrounded by dozens of bugs)
There are 3 tricks you may use to hide, so you are not bitten from all 4 sides:
- The golden key from the Ogre in the start of the level (if you have not used it yet). There is another golden key on the floor, but you can’t rush towards it fast enough.
- The secret room in the Fighter’s challenge. (the button is on the west wall)
- Or just try to quickly kill all the monsters until you advance to any corner.
All three of those are hard, and you will probably lose one of your chars, while trying to hide there.
So – If you decide to fight the Challenge:
- Be at least level 12, so you have better chance to survive.
- Before you start killing – Bash your way to any corner OR try to open the secret room with the 4-th treasure (4/7 – Ancient apparatus) OR use the golden key and make your stand there. This way you will only need to fight 1 to 3 bugs at a time and your rear chars will take fewer or no hits.
- Use freezing bombs to stop attacks from any side that’s bugging you to death and focus on the other side.
- Cast as many mass damage spells as you can before your mage falls. Alas, this char always falls first.
- Mix some health potions before battle and have them handy so you don’t lose time finding them in the middle of the fight.
- Leave this battle for a time when you have (re)opened the way to levels 5 and 7 already, so you have access to the blue stones. This way if anyone dies – you can revive the char by using the blue stone before any other battles. (Yes, if at least one char survived – let him drag your bodies to the blue stone – and you are okay).
That’s all the advice I can share. I managed to kill them all with always at least one dead char, but the reward is worth it:
If you are still level 10, this battle is probably not for you. Read below and decide if you want to grind until levels 12-13 in the “Haunted halls” area.
Vault of the orb. (Secret).
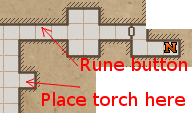
The secret room is opened by placing a torch in the main hall *(there is only one empty torch stand – can’t miss it).
There is a skeleton and grenade for taking (you need this for more damage in the fighters challenge).
Immediately in the same secret room with the grenade is a rune-button (north wall), which opens another room.
Step on the pressure plate.
You need something cheap and heavy (such as the shield of the skeleton you just killed) to press the plate behind the teleporter.
Place the shield in the teleporter (don’t throw, but exactly Place it).
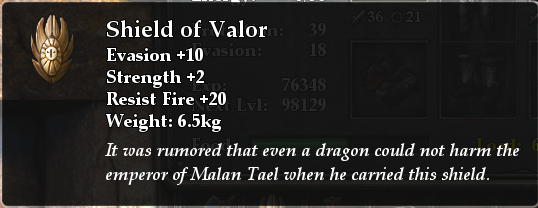
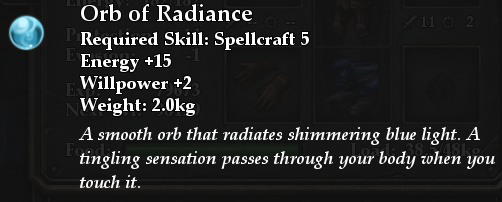
Enter and loot. The orb is very good for mages:
The bad part is … yes … you guessed – two more crabs. And the exit will be closed, so you can’t run to safety.
If you can’t kill two crabs – better leave this secret for later.
Ice bomb is the best choice if you get cornered or mobbed. But you better save it for the Fighter’s challenge.
When done – The same rune-button which opened the room opens the way out.
Haunted halls and Maze of madness.
There are a half dozen of snails which you can kill for food.
When you get back near the entrance of the area, 2 of the snails will re-spawn.
Finally a room designed for food and xp 😉 They only give 60 xp, but it sums fast with the 3 respawning skeletons in the Haunted halls.
Haunted Halls.
The other fun place. There will be 3 respawning skeletons for training.
Apart from the easy training, there is:
- One Secret room triggered by a hidden button with 2 skeleton archers which guard a +50 cold resistance amulet.
- Another secret room (again triggered by a hidden button) will have skeleton pikeman squad (x4) and some Heavy shield and ring boots.
- Third secret room for which you need a patient skeleton to stand on the pressure plate until you run for the door 😀 A bit tricky but you will find a way to do it. Squad of skeleton pikemen, few herbs and Another round key.
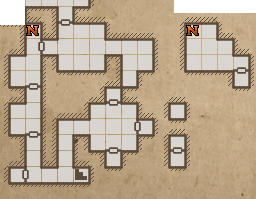
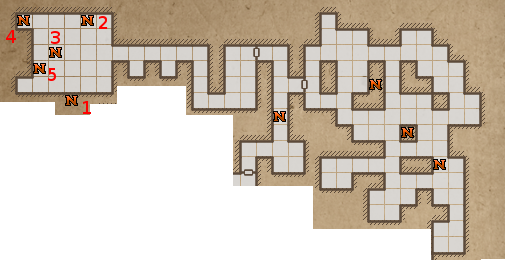
I’ve marked the 3 spots with “N”. Feel free to spend some quality time here bashing skeletons. They only give 90 XP but there will be 3 of them + 2 snails in the other room.
The full cycle is giving 390 experience points and takes 1-2 minutes to complete. (15 minutes = 3900 experience):
Maze of madness.
This is a bit tricky and there are 2 things here. Another round key and a +25% experience amulet.
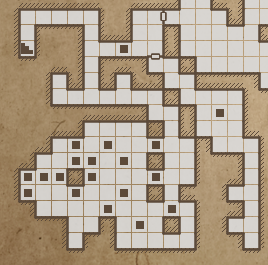
To reach them, first you need to find the 2 buttons and press them. Have a look at the minimap above
First button is on the south wall (1) and clears the way to the key (4). If you don’t press this button, there is another teleporter in front of the key, and you can’t enter.
The second button is near the round key (north wall (4)) and clears the path to the amulet.
The teleports are not very tricky. It takes some trial and error – I’ve put the important ones on the map (see the “N” signs).
Treasure area.
Once you use the round keys to open the way down, the way back to level 5 will also reopen.
There are 4 round keys total.
The Fourth Round key is not mandatory to pass the level – It opens a secret room with Chitin Armor.
You only have one gold key, so choose wisely:
- Tome of fire: +3 Fire skill and +10% fire resistance.
- Crossbow.
- Herbs, flask and fire bomb.
[For me, it was a no-brainer. I love spells, so I’ve chosen the tome]
44 Responses to “Legend of Grimrock – level 6”
Sorry, the comment form is closed at this time.

Hey buddy.
I think that I found a spot that you missed.
Over the second hiding place when we get the Fire Sword there’s a button.
This button opens a stairway in the hiding place before to the Level 5 with a Plate Gauntlets +12 and a Plate Cuirass +12.
Although there are two fire elementals guarding those.
Thanks for all the help.
I was sure there is a way to level 5, but did not find it.
Will check and redraw the map.
[Edit: Done! Thanks!]
Thanks! I am at level 7 now, gonna be hard. 😉
Level 7 has too much slimes for my taste.
The Maze of shadows is quite easy, still can’t figure out how to go to the teleporter though. I see it’s there by the blue light it emits.
there is a button on the east wall before the box of food opens the door to the teleporter
Yeah, found it already. Almost missed the button in a first glimpse.
The trick I used on the fighters challenge was to cast invisibility so I didn’t usually get mobbed right off the bat and could get to a wall a lot easier. Took several tries but I got to the wall used the golden key had to kill a couple and made sure I had healing potions ready. I also used my freeze bomb to freeze the one in front of me so I could mix more potions.
But the invisibility scroll is only avaible in the level 8, isn’t it?
Did you looked online for the spell or remembered it from playing before?
I remembered it from playing before.
I found one sometime before level 6. I don’t know where.
Yes, it is in a secret place on level 4, accessible from level 3.
You need to reactivate a teleporter, and it sends you to a secret room.
For the secret room that requires a skeleton to stand on the plate use a freeze bomb or spell to hold it still.
Good idea – Never thought of that.
Actually I lured 3 skeletons there, and at least one of them stood long enough on the plate.
stand on the button, the door will open (so you dont have to wait for it.) when a skele starts stabbing you, step back once. he hill follow you. let him stab and immediately make for the door. By the time he is done stabbing at you, you’ll arleady be there.
Is it possible to tell me the stats of the crossbow??? thnx
Nvm i load/save!:D:D
Yeah, I did the same.
Sorry for the late answer – The crossbow was completely ordinary and there was already one on previous level – forgot where exactly.
If it was good, I would post a picture.
Good work man,
Your full map helped me tremendously, I even bookmarked your blog!
Thanks again for this awesome guide, much easier to follow as well as enjoy exploring comparing to youtube.
Thank you Link. It is fun writing tutorials for games you love to play.
YouTube walkthroughs are hard to follow. I’ve tried once but lost patience quickly and explored the forums instead.
you can read text as fast as you are capable. Video only goes as fast as it was recorded and skimming isn’t nearly as easy or reliable.
A Trick for the challenge in the beginning, wait until the ogre wanders off, go onwards, kill the 3 spiders, run to left and hide in the spider grotto (5 more spiders there)
So you can finish the ogre later without worrying about the sh*tty spiders…
Never tried this. Took me 3 tries to kite him down – it happened to not be hard at all.
Found a place where he was charging back and forward, while I was shooting arrows and leaving poison clouds in hit path.
The ogre has never been very close when I take on the 3 spiders, just run away from him and he will forget about you — the spiders are fast enough to follow.
Also, backstabbing makes him rather simple since his charge is so easy to dodge.
You can easily do the fighter challenge at level 9. Just completed it with a Fighter/Thief/Mage/Mage team. Used four heal and one mana potions. Just got to make sure you get to a corner, then use all you got to kill. Acid cloud and regular cheap fire attacks work great, or freeze the mob on one side while taking out the mobs on the other. It did take me a few times, but I ended up just losing one of my mages.
Exactly 🙂 But I recommend being higher level.
Hi m0rd0r again,
i found out something really interesting about this level, which i cleared totally, just like your walkthrough.
Now, i went to the Hall of fires, fall down one pit, and when i get back to the Hall of fires, the 2 fire elementals are normally respawned and ready to be killed again and again and again. For 500XP each, that is quite better than slaying the monsters in the haunted hall and maze of madness. Okay, Maze of madness is good for food.
I tried the Hall of fires action 5 times now, and sometimes even the craBs respawn.
Can somebody verify my story/game mechanic?
Greetings,
Kralle
P.S.: I am running a party of 2 minotaur fighters and 2 insectoid wizards.
quick reply:
sometimes, when i felt down a pit in the hall of fires walk back there and the fire elementals didnt respawn, i go the the maze of madness, kill the 2 snails.
after that, the fire elementals are waiting in the hall of fires 🙂
You seem to be doind quite well – don’t know what you need verified.
It is good to know that Elementals also respawn. They are faster experience than skeletons 😉
I just have to note that I managed to do the fighter challenge on level 8 party of minotaur warrior with swords, liz rogue with daggers and two insect mages.
First try was a bust, didn’t make it to the wall, second I hid in a corner but lost one of my mages.
When I found the secret room I actually looked it up where it was from starting point, the button was direct left.
Took me 5 to 10 tries and creative usage of mage bombers to rush on wall, hit the button and get in the hole. (My mages kept dying on me and I wanted to get it done without casulties)
Once I made it in the hole, I ended up only using 2 healing pots on my minotaur (high prot, low low LOW evade) and possibly 1 on my rogue (Avoidance tanker, had around 75 evasion). I would pretty much advice against this lil tactic unless you want to curse several times (because the survival of the mages is fully dependant on luck)
You have the patience of a saint. I just abandoned the idea of surviving mage and revived him later with the blue stone.
Later, I’ve let him keep the XP amulet so he catches with the level, but it was not that much of a loss anyway.
I am curious If I can solo the challenge with Toorum 🙂 But not there yet.
Hi can anyone tell me how to kill all the fire elementals in the tradpoor room so I can do the thing with the column and switches please ? Iave already killed about 14 ? thanks
You cannot kill them all. Every 10 minutes there will be 3 more regenerated.
And each time you fall in the trapdoor and return – 2 more will be regenerated.
It’s by design.
But you can use this to train your party well. They give 500 xp each.
thank you ! Also your walkthrough is awesome ! I would have missed SO much of the hidden things without it 🙂
In Fighter’s Challenge i did it with all characters level 11. I put lurker armor on my mage and fought to a corner put him against the wall gave my rogue the lurker armor back and went to killing 5 tries 5 health 1 mana potions later no one died.
I worked out a very effective way to complete the Fighter’s Challenge. Before stepping on to the square which teleports you inside, place an item on the ground there. It will activate the teleporter but without sending you in. You can then fire missiles and thrown weapons (including bombs) safely through the teleporter, killing many of the bugs even before stepping inside. Spells don’t get teleported though. I also recommend throwing a frost bomb through as the last action before going in. You’ll end up with a frozen bug in front of you. Turn left once and smash your way forward through the hopefully thinned out bugs, the button for the secret opening will be on the wall directly in front then step inside and fight the rest of the bugs which can come at you only from the front.
First attempt with this strategy I completed the battle without a single casualty 🙂
Sounds very good and may be the cool way to pass this challenge with Toorum.
Still not feeling ready to solo it with Toorum. But this can work 😉
I’m not sure if you put this, but to left of sequencis there is an empty torch holder, if you put a torch on it, it opens a trapdoor to the left. Inside the secret area theres a pikeman and 2 firebombs
Yes, this is the “Vault of the orb” area.
You probably missed a rune button on one of the walls in the place where skeletons were.
But don’t enter It if you can’t battle 2 crabs without dying.
I didn’t see any crabs afterwards, or any orbs? I just saw the two bombs and that was it, it said found secret and I didnt see anything else?
Nevermind haha, just found that rune button
I beat the fighters challenge with all chars alive while they were lvl 11 and without using a heal pot.
Strat: Mages equipped with four fire bombs a piece. Charge door dropping f bombs (pardon the pun). Stand in door and fight. I did keep poison cloud up most of the time.
Hope this helps someone.
Ps fantastic game and guide for it.
You bashed head-strong with firebombs 🙂 !? Quite bold. I kept them for later and never used them for this challenge. End game fight actually needs many lightning bombs 🙂
thanks for the guide :9 helps a lot when missing thoose crucial- neverthought there would be something there- walls by the way beat the fighters chalenge with level 9- party Fighter-Fighter-Rogue-Mage no items/potions used, the plan was simple find a wall- back to wall- find a corner and slash/fire-ice them to death with the rogue Crossbow 33 points on missile weapons and 2nd fighter 35 points sword it was one round per group.
so find a wall find a corner and have a go at them.
It was a long time ago when I plaid this game, but I was wondering if someone did the challenge with Toorum 😀
*THAT* will be really challenging 🙂