Apr 262012
 
Legends of Grimrock level 5 map

Legends of Grimrock level 5 map

Level 5: Hallways

You start in a hall full of statues.

There is a light coming from the ceiling, so I suppose there is another secret room in level 4 from which you can fall here. (drop me a message if you know)

2 rooms have levers for opening and third room is accessible from there:

NW room has a scroll of fireshield and 2 bolts.

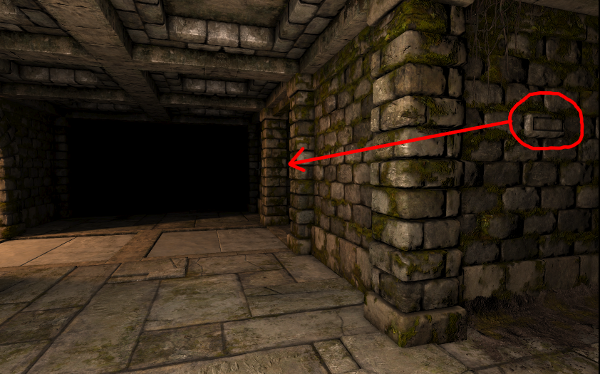
SE room has a loose brick which opens a wall. Inside the wall there is another button to open a secret room with good +8 evasion cloak.

Inside the 3-rd room is a chest with useful spell (Light). And few ingredients and food.

Having “Light” means – no more torches in hand for you πŸ˜‰ Also – no more searching for torches.


The iron key is in the 3-rd room also.

You can’t do anything for the cave in (fallen rocks), so open the SW portculis with the iron key.

There is a trapdoor to level 6 with another Toorum scroll :). He claims there is nothing in the room, but in fact, there is Toorum Scroll πŸ˜€ … Brain = blown πŸ˜‰

One of the rooms has 2 alcoves with food and the first Dragon statue. Take the rations.

One of the corridor has barrels and boxes. Nothing inside them.

Go east to find the pit room.

3 buttons control the trap doors.

You need to click them in order – South, Southeast, South, Northwest and then grab the key.

2 flyers will show up from hidden rooms and attack.

One of the flyers mass hits with electricity so kill it quickly.

Toorum note and a herb in the hidden rooms.

(Edit: Thanks to John) In the room below the trap doors. Near the teleporter back is a hidden button which opens a secret door. Fire and Lighning bombs there.

Beware the 2 flyers, one of them breathes lightning too.

The toorum note explains how to enter the room with the lever and 2 button. It is a bit tricky but you will manage (Click buttons in order Right, then Left and then pull the lever down and return up). Conjurer hat, some food and a helm:

Save.

Go to the door with iron lock and open it.

4 flyers. 2 lightning and 2 normal.

Take them down.

In the next room you will find useless +2 cloak and the blue stone.

The Crabs behind the portcullis are strong, so save again. Fight can suck if you try to bruteforce the crab. They fall better if you kite them around, but here – there is simply no space:

Open portcullis and hit hard. If you have some damage over time spell such as poison cloud. Cast it and close the portcullis. 450 experience per kill.

When both crabs are down, explore the next area.

You will find chain greaves (heavy armor).

Near the cave in is a secret room. You can open it from the corridor outside with a small loose brick. (the corridor before the Crab).

West room has a scroll behind the barrels saying

“The gate of iron shall open
if you take your time
and rest in the place
where the dragons gaze.”

You need to find both Dragon statues first, but if you need spoiler, have a look at the map in the beginning of the text. I’ve marked the spot with”X”.

From this hall – There are 2 areas: Chamber of pits and Deserted tunnels.

Chamber of pits.

Chamber Of Pits

Chamber Of Pits

Press the button and try to remember how the trap doors in front of you follow the path to the next corridor.

If you fall down, there will be some skeleton fight. 1 pikeman, 2 loose archers and a squad of 4 pikemen. The fight is not fight, but try to kite them around, so you don’t get hit a lot.

Some food and herbs as well as few ice arrows are laying around for taking.

Stairs back to level 5, another bow in the alcove and a lever to open you the way back to the pit room.

The right “Dance” above the pits is:

Press the button.

Start with your back facing the lever.

W-W-N-W-W-S-S-E-E-N-N-W-W-S-S-E-E-S-S-W-W-S

(west-west-north-west-west-etc.)

Have in mind, there is another crab there, so be careful.

Save.

Kill the crab,

Go inside the room and take the key.

Fight another crab, 2 poison mushrooms and one mushroom herder which pour out of the walls and the first ornate key is yours.

Drop something useless in the alcove where the key was, and the wall will open to allow you to go back.

There is another way back with button and lever.

Just reverse your advance back, using the same steps or simply fall down on level 6 and get shortcut.

Now is the time for the secret πŸ˜‰ :

W-W-N-W-W-(click!)-S-S-E-E-N-N-W-W-S-S-E-E-S-S-E and then turn around… the pit will stay closed.

Bracer of fortitude:

Not a miracle, but will help in the fight ;).

Click the loose brick on the south wall and the pits will make another closing cycle for you to get out (or simply fall down and get back).

Deserted tunnels.

You need to kill some monsters here.

There are a stone and a pressure plate in the first corridor.

There is also a lever.

Need to time your steps to enter in the tunnels.

The lever closes the porticullis, creates a teleport over the pressure plate and opens the wooden door.

If you drop the stone on the plate before this, it will be useless. (teleporter will remove it and depress the plate)

Click the lever, turn around and throw the stone to the pressure plate, turn back and run for the door. If you do it before the clicking ends – you are okay.

“There is not turning back” πŸ™‚ … uh-huh.

Poison mushroom for killing.

One room which can be used as a rest place with chain gauntlets and a herb. Use the chain to close it if you are in need of a rest or there is a crab on the other side. (2 total)

Advance a bit until you hear walls moving and run back to this room.

There will be a mushroom herder, crab and poison cloud mushroom released against you.

Keep exploring and you will find a warhammer (and another crab will be released). Kill the crab either with kiting or hide-and-hit behind the portcullis in the room

There will be another release of herder and poison mushroom near the room where you hide.

Keep killing until there are no more.

Go to the next room and take the second ornate key.

Once you take it, the corridors you were before this will be filled with skeleton pikemen and you need to fight some weaklings.

There is a secret room with a portcullis near the Dragon statue.

It is open by the same lever that opens the door (with clicking sounds).

Just run in the oposite direction this time.

Huntsman cloak, mushroom and fire arrows.

Open the way to level 6 and kill all the skeletons.

Open the iron door by resting in the place where the dragon statues gaze (no, not in fron of where they stand, but on the square of the map, where their gazes actually cross. Not hard to find out (see map, the spot is marked with “X”)).

When you sleep for 10 seconds on the spot, the Iron door will open.

There is lurker vest inside the secret room. Not very good, but without penalty so – it’s up to you if you want to keep it.

This concludes everything you can do on level 5 for now. Descend to level 6.

 Posted by at 8:23 am
Apr 252012
 
Legend of Grimrock level 4 map (Archives)

Legend of Grimrock level 4 map (Archives)

It begins with one bad fight, regardless if you choose the secret entrance with the slimes or the main with the 2 mushroom herders.

Slimes are too strong for a beginner and need very good kiting skills (or hiding behind the door and resting (see the end of the text)).

Mushrooms herders can be killed with easy kiting.

What does kiting mean?

In short you need to run around and hit them with spells and arrows, never standing in one place for too long or they will cast poison cloud.

Also never stand for too long in the corners or they will surround you.

After you kill the mushroom herders they will drop the key to reopen the door from where you came and the next room.

There you will find a small alcove with a recipe for the restore energy potion and an empty flask for it.

Next room is a big hub with 4 teleports, alcoves and hints written on the wall:

Legend of Grimrock level 4 hub room

Legend of Grimrock level 4 hub room

There are also 2 groups of skeleton archers. Which are not really hard.

You will return in this room few times, so get used to it.


There are 4 teleporters, 4 alcoves for you to place something and 4 inscriptions which explain in which puzzle room they lead you.

First one is the most rewarding:

Time and tides

Time And Tides

Time And Tides

This puzzle turned out a bit hard, because I did not figure out how to take the book inside the secret room, so here it is in a nutshell:

  • There is a plate, which when stepped upon makes 3 clicking sounds and then a teleporter shows above one of the trap doors.
  • There are 3 throwing daggers in nearby alcove.
  • Obviously you need to throw them in the showing teleporter.
  • On success, the dagger falls on nearby floor plate and closes 2 of the trap doors.

Don’t forget to fall down to level 5 and collect your daggers that missed and get a maggot-on-a-stick for a snack.

Now put something heavy on the floor plate and stand where the portal appeared. Secret room with “the book of wisdom”. This book is like a free level up (+5 skill points), so be sure to take it!

Legend of Grimrock, level 4 secret with a helmet

Legend of Grimrock, level 4 secret with a helmet

Next corridor is about timing.

When you step on the plate, the trap doors start closing and after about 5 seconds they reopen.

You need to time your advance good enough and have in mind that a flyer will come to stay in your way.

(lure and kill him before starting the corridor or patiently wait for it to come).

There is a secret door opened by a button you may simply miss, there is a helmet inside.

Have in mind, that if you fall – you need to fight a bunch of skeletons down on level 5.

4 archers and 2 pikemen to be precise.

You will fall in one of the two rooms, and there is teleport back to the hub in one of them. Fight your way out (you always reemerge in the main hub)

There is a small cell which can be opened from inside only (on this – later, you need to finish another puzzle room to enter it).

Get back from level 5 and reenter “Time and tides”.

Try to walk quickly the whole trap-door corridor.

One square before the closed portcullis, turn left. You will see a floor plate.

Throw another dagger and the portcullis will open. Run there before the trap-doors reopen.

You are almost done with the “Time and Tides”- The next room is the junction. You will always end here whenever you pass a puzzle room from the main hub. They are 4 total.

All 4 parts of the hub rooms end here and have a scroll in the end, in front of the central teleporter.

Get the scroll and go in.

You are transported to the hub again.

This one scroll you just got needs to be put inside the alcove on which is written “Crimes forgotten” – “But never forgiven”

Trails of thought

There are only two rooms, but you need to know how to pass them:

Trails Of Thought

Trails Of Thought

Puzzle 1:

All plates create or remove 2 or more portals.

All portals take you back to the beginning and close the door to the next room (if open).

The correct way to walk over them is:

Start from the door and walk like this -> EEESWNWSENWN (Click!) ESWNESWSENES

(east – east – east – south – west – north …)

Then you need to fight a flyer.

Puzzle 2:

There are 4 floor plates.

First one in front of the door resets the puzzle.

Look southern wall while standing on the middle plate and click the secret room.

Then go back and collect the toxic dagger.

Optionally: Fall down in the trap door to level 5, so you gather 2 slime balls. Use the teleporter and get back to this part of the level. (In this case, you need to pass puzzle 1 again)

The puzzle 2 goes like this:

Start from the door and walk inside, then go EEWEWWEWNSEWN

Grab key and you are set.

There is a skeleton and another scroll saying “by this call”.

You are not done here.

  • Get back to the corridor.
  • In the small part of the corridor, you will see a loose brick.
  • On pressing it two trap doors in the big room will get covered.
  • Above the second trap door is a button, which removes the teleporter in the center.

Enter the trap door below the teleporter and you will get to the secret room with the gear key on level 5.

Get back to the main hall and put the scroll in the alcove saying “Caverns still echoing” – “by this call”.

Use the gear key in the side corridor in the main hall and you will enter secret room with Chitin greaves in the alcove.

Beast gardens and menagerie.

Beast Gardens And Menagerie

Beast Gardens And Menagerie

Click the button and quickly stay in the way of the light blast the head is spewing (or the portcullis closes).

Kill some skeleton pikeman for experience. It is always useful. They only give 90 xp but they will keep coming until you close 3 of them in the small rooms.

No problem getting to level 7 or 8 just by those kills, so be clever and patient.

The only thing that can stop you – you will run out of food.

When fed with easy kills – open all small rooms with floor plates and lure skeletons inside.

They will be trapped but will press the plates for you.

Go to the room with scrolls and get the 3-rd one. “but still dreaming”


SAVE!

There will be a surprise when you get back to the main hall. (But if you took my advice, you will already be level 8 with your whole party and you will do fine)

From one of the grids on the floor will emerge a small hydra and start biting.

  • Step back…
  • advance …
  • hit …
  • step back …
  • repeat until dead.

Drop the scroll in the alcove saying “Put to sleep” – “but still dreaming”

The catacomb

Prepare for some heavy bashing. There will be skeletons of both kinds all around.

This is the only “hard” part in this puzzle.

They will try to surround you and kill you, so be prepared. There are 5 archers and 2 pikeman in the first room.

When you clean them – fall down in the trap doors. There is a tar-bead (healing) herb.

Watch the floor. Another Toorum note saying that “He found he is not the first descending here”.

A floor plate with chunk of meat. Get the meat to de-press the plate.

There is a small room with skeletons pressing another plate. Release and kill them. May need some kiting, because 4 skeletons are still quite a threat.

In the same small room, except the floor plate there is a button.

It opens a secret room behind with skeleton and a bag with 2 tar-beads, food and leather gauntlets.

The third floor plate is in a corridor with a stone pressing it.

There is a secret room with squad of 4x skeleton pikeman in the end of the corridor, guarding a firebomb and a hat suitable for archers. The button is a bit hidden (Thanks to Tigara for pointing this out):

When you remove all weight from pressure plates – get back to the start of this area. All trap doors are closed.

The 4-th scroll says “to depths beyond measure”.

Last scroll is for the alcove – “Eternally imprisoned” – “to depths beyond measure”.

Save πŸ™‚

… this fight needs some guts and wits.

Run quickly in the corridor where the portcullis opens (towards the end of the level).

Turn around and make your stand.

This way you will not get surrounded.

Fight.

There will be about 20 beetles swarming towards you.

When your front chars get low on health, run in the area with the blue crystal and recover quickly.

Run back in the corridor and finish the fight.

When done, loot the room around the blue stone. Frost bolt scroll (level 13), frost bomb and a chunk of meat.

Return to the hub hall and look around the place. The alcoves where the small screaming insects were hidden have one battle-axe (lame one, can’t carry it without Axe skill 5) and a lever which opens the 4 portals again.

Slimes

Return to level 3 and go down to level 4 in the green slime secret area.

You are probably strong enough now to take them down 1-by-1.

Use “coward tactics”.

Lure them to the door and fight with only one slime at a time or they will disease you and overwhelm you.

There are 7 slimes total. The ones around the door are the most annoying, because you will get hit while trying to lure them out.

There is golden deity figurine here (Treasure 2/7).

Some slime-bells for alchemy and a green stone (emerald) in a hidden room (opened with button on the south wall).

The emerald you need to feed to the statue in front of the entrance of the slimes room.

A secret room is opened. There are 2 poison bombs and arbalet + poison bolts.

The arbalet does 20 base damage, so if you used a bow so far – stick with the arbalet until bolts run out and switch to bow just in case you need to kite like the beginning of level 4.

This concludes everything that can be done on level 4 for now.

Go back to the blue stone, save and descend to level 5.

 Posted by at 1:20 am
Apr 182012
 
Legend of Grimrock, level 3 map

Legend of Grimrock, level 3 map

I suppose you passed first two levels with ease. If not, look here:

Level 1, Into the Dark and

Level 2, Old Tunnels.

Lone pillar of light

Lone pillar of light

The first puzzle on level 3 starts from the very entrance.

“A lone pillar of light, stands alone in the dark”

The lone pillar is in the center of the first room, and there are torch stands on it.

Remove all torches on the wall, go in the previous level 2 and collect some more. You need 3 torches lit on the pillar and none on the walls.

Click! And the door opens.

Pillar of light is lit.

Pillar of light is lit.

2 trap doors, flyers and a skeleton archer

2 trap door, flyers and skeleton archer

In the next room You need to slay a skeleton archer and some flyers. Just avoid the poison arrows.

The big room has 2 trap doors for closing, but first drop down and loot.

On the middle part of the room there is a button (see the picture). Click it and you will have a way to throw a stone and close the trap doors. (throw it far and high, aiming at the torch)

Go where the floor plate is and collect the stuff in the 2 alcoves.

The next corridor has 1 locked door and a room with trap door.

Save the game!

Coward Tactics for 4 skeletons

Coward Tactics for 4 skeletons

Normally – The room is opened by a button and if you enter, the plate will close it behind you.

When IN the room, 4 skeletons will attack you, surround you and kill you.

(You almost always die, when you are surrounded.)

Stay outside the room instead and drop a stone on the floor plate to activate the portcullis and the skeletons.

They will start going around the room, open the door but stay in one place and wait for 1 skeleton to come.

Kill him and close the door.

This way you can kill them 1-by-1 and close the door with the button to rest a bit between fights.

When all 4 skeletons fall – open the door and enter.

All alcoves have something useful, so loot everything and don’t forget to Fall in the trap door and loot there too. It’s not much, but it is okay for level 4 heroes.

There is a lever which opens a secret way out πŸ˜€ … which you’ve already cheated, but open it. There is a herb there.

In one of the alcoves is the key, so grab it and get out to unlock the next part.


Spiders bite and poison.

After the spider fight in the next corridors, you will find the healing stone and trap doors which you can’t close yet (but may still fall down on level 4 and loot).

Ignore the way north for now and turn east. Another room with trap doors and spider. Take the spider down. Use the mortar and pestle to make antidote potion if you are poisoned.

The trap doors will lead you to a secret room on level 4. Useful one. I recommend you fall πŸ˜‰ the item is really worth it this time.

Level 4 big secret room

Drop something on the floor plate.

Go east and find the button. It disables the teleport field.

Now put some useless stuff on the 2 plates behind the portcullis (you can drop stuff on the plates behind, regardless the portcullis are closed)

When all 3 floor plates are clicked, the portcullis will open.

There is magical bracer with 50% poison resistance. Very useful against spired fights, so put it on any of your front chars.

Another secret is opened if you reactivate the teleporter and enter it. A room with level 19 spell “Invisibility”. (Thanks to Orley Lima, for pointing it out)

Get back above in the room with the trap doors and enter the secret room with the Health tome. It gives +25 hit points permanently, when read (1 time only). Here is how to open it:

Book of health on level 3

Book of health on level 3

You will probably fall when you click the second button, but don’t worry. It is a small sacrifice πŸ˜‰ Give the book to someone who dies often. +25 health is quite a good plus.

Thanks to Anders and Stian for pointing this!

The running teleports room.

First you need to close the trap door. (Don’t jump – it leads to the room with the bracers, and you just looted it)

To close the trap door you need to enter the room and follow the running teleporter for two squares, turn left and throw a [stone/shield/whatever-heavy-junk-you-have], so the plate is pressed. This will close the trap door so you can use it to Go in the room,Β where you just pressed the plate.

There is an alcove with 3 poison grenades.

After this, you need to drop another stone to the other plate, so the portcullis opens.

This need to be timed very well, so the portcullis stays open until you pass. If you throw the item early, the teleporter will transport it back to where you started and if you are not quick enough, the other teleporter following the first will either take you back or the item you used. Just try few times and you will make it. Look the two pictures here for reference:

After you get to the next corridor you will have to fight another spider and will find 2 piles of spider eggs. Some arrows in one of the egg piles.

(On one of the walls there is a lever which opens the way back to the teleporter, so you don’t need to do this again.)

In the east corridor, a small inscription says “I demand a sacrifice”. Put an object on the trap door behind the portcullis and press the button.

If the sacrifice is accepted – you will get one iron key and one light armor. (Spear from skeleton soldier is acceptable sacrifice if you have spare one)

There is also one big room with 4 spiders and lots of eggs. (use “coward tactics” again, take them 1-by-1, closing the door to rest.)

If you already have the poison resistance 50% bracers I recommended – you will have more chances against the spiders.

There are 3 egg piles you need to break, so you take the other iron key and the long sword.

The door that is opened with the 2 iron keys leads to a room which has a secret like the “Pillar of light” in the beginning of the level, but REVERSED.

It is so to speak …

“Pillar of darkness”.

Put two torches on the walls and don’t put torches on the 3 torch stands which form the central pillar in the room.

A room with a trap door and a lever will open. (ignore the trap door, you’ve been there already).

The lever opens the secret room on the other side of the trap door with an alcove having a cloak good for archers.

To enter this room, you need to remove the weight from the floor plate which you used in the 2 circling teleports room to close the trap door in the center. The same plate closes the other trap door if NOT pressed.

There is another small puzzle, which involves speed. —>

You need to push one button to open the way (and a spider) to the portcullis.

Kill the spider.

Now press the button which opens the portcullis.

RUN towards the portcullis before it is completely open and enter.

There are 2 spiders inside and a button which will stop the portcullis from closing anymore.

After this tricky room, there are some corridors with few more spiders to kill.

Now have a look at the room I’ve pointed on the map below as “Sanctuary“:

Sanctuary room for you to rest from spider attacks

Sanctuary room for you to rest from spider attacks

  • Enter, close it from inside and loot.
  • Rest if you need.
  • Start going out and have a spider follow you.
  • Get back to the room and stay in front of the door slashing and bashing the spider, until it dies.
  • Close the door, save, rest. If badly poisoned – use cure potion (1 flask, 1 cave nettle in the mortar and pestle).
  • Once you get brave, there will be a hidden room opened near the “sanctuary” with another spider inside. (and an edible mushroom)

In all cases – Don’t let them surround you.

There are 9 spiders total in the big room and when you kill the last one, he will drop the gold key.

Also around the spider eggs, you will find a round shield. A bit better than skeleton kite shields.

And a meaningless note saying to beware the spiders.

DOH! You don’t say.

Spectral relay room.


  • Put something on both floor plates – in front of you and behind the portcullis and step aside.
  • If needed, raise the item, so the spectral relay shoots again.
  • There is a baked-maggot-on-a-stick hidden back there, so go grab it. (uh, yum … I suppose).

You are almost done.

A lever to close the trap door and a second note from Toorum *(hint about greaves, but he doesn’t know how to open the door)

Luckily you have the gold key and can grab the greaves and a good mace.

After all is done and the way to level 4 is in front of you, go back to the sanctuary near the spider room.

Go north – A new secret room is opened with a small hidden brick button, 2 herbs and another entrance to level 4.

This entrance leads to a part of level 4 which will be a bit hard for level 5-6 chars, so I suggest to leave it for later.

The glowing slimes will kill you very fast.

This concludes everything you can do on level 3. For now.

Go down to “Level 4: Archives” and fight the 2 mushrooms. The fight needs some kiting skills. So … good luck πŸ˜‰

 Posted by at 11:12 pm