This is a small setup instruction for BGP peering test, followed by a small group of test scenarios.
I did a lot of job interviews this year. Some for QA, some for Network Administrator, etc. Lately, for a job interview, I was asked to do some routing configuration. As a home-work. So, I hope by sharing this, I can help you get the basics of this simple routing setup.
In the past, when I was working as an ISP network administrator in Telecable SA, I had to set a BGP session to my main ISP. For this I used Zebra.
Zebra was discontinued in 2005, but a brave group of open source enthusiast grabbed the idea and continued working. Since then the product grew into a better routing software supporting even more protocols. They called it Quagga. The list of supported protocols now goes as:
- BGP
- OSPF
- OSPFv6
- ISIS
- RIP
- RIPNG (RIPv6)
and of course
- Zebra
So this is a small tutorial, how to set a BGP session between 2 virtual devices running Quagga. For this tutorial, I avoided my preferred distribution, because It is a bit more complicated there. I also used virtual appliances, because I don’t have the spare hardware. Named the 2 routers BCN and TKY (Barcelona and Tokyo).
So, there goes…
- First, we need a VirtualBox installation (get it from here).
- Then we need an easy to maintain and install Linux (Like Ubuntu LTS 14.04.3 from here)
- Create a new virtual box with default values, just increase memory to 1024.
- Add 2 more network adapters attached to “Internal Network”. Don’t alter the first network adapter for now. Leave as is.
- Set Adapter 2 name to “BCN2TKY” and Adapter 3 to “CustomersTKY”
- Mount the downloaded image as a DVD ROM.
- Install Ubuntu into the box.
- Start Gnome Terminal and execute the following:
apt-get install quagga
 (confirm when asked).
- Edit /etc/network/interfaces with your favorite editor. I prefer Midnight commander (sudo apt-get install mc). Ubuntu has bad behavior with virtual network adapters and tends to disable and remove IP addresses if you are not sending traffic, so we need to force it not to touch them by issuing static IP addresses. For each interface we are going to use, we need a static entry like this:
iface eth1 inet static
    address 10.1.1.1
    netmask 255.255.255.0
iface eth2 inet static
    address 192.168.101.1
    netmask 255.255.255.0
(you have to be root. e.g. sudo mcedit /etc/network/interfaces)
- Restart the network manager by issuing:
sudo /etc/init.d/networking restart
- Alter the /etc/quagga/daemons file to enable Zebra and BGP daemon. Just replace “no” with “yes”. Disable all else:
sudo mcedit /etc/quagga/daemons
- In /etc/quagga/ – Touch (create) the files bgpd.conf and zebra.conf.
cd /etc/quagga/; sudo touch bgpd.conf; sudo touch zebra.conf
- Change ownership of all files in /etc/quagga/* to be quagga:quagga (both user and group).
sudo chown -R quagga:quagga /etc/quagga/*
- Restart Quagga, and it will run the zebra and bgpd
sudo /etc/init.d/quagga restart
- Stop the virtual appliance.
sync; sudo halt
- Wait a bit and close the window. Confirm you want to power it down.
- Go to VirtualBox and clone the image we just created.
- Use hard clone, check “generate new mac address”.
- Use name “BCN” for the cloned virtual machine.
- Wait for the clone to complete.
- Go to the Network adapters and alter the 3-rd one to point to “CustomersBCN”. We need this for tests later.
- Boot the machine.
- Alter the entries in /etc/network/interfaces :
iface eth1 inet static
    address 10.1.1.2
    netmask 255.255.255.0
iface eth2 inet static
    address 192.168.1.1
    netmask 255.255.255.0
- We are almost set with the setup. Alternatively, you can clone at least 2 (or more) machines with names “BCN-Customers” and “TKY-Customers” and set their second network adapters to “Internal” with names “CustomersBCN” and “CustomersTKY” respectively. We are going to use them later for testing of the BGP peering.
- Set their adapters in the corresponding group and set the IP address in /etc/network/interfaces. E.g:
BCN:
iface eth2 inet static
    address 192.168.1.2
    netmask 255.255.255.0
TKY:
iface eth2 inet static
    address 192.168.101.2
    netmask 255.255.255.0
You don’t need Quagga installed there, so you can remove the package after cloning or just disable its run-script by issuing
sudo chmod a-x /etc/init.d/quagga
In the end, you need something like this:
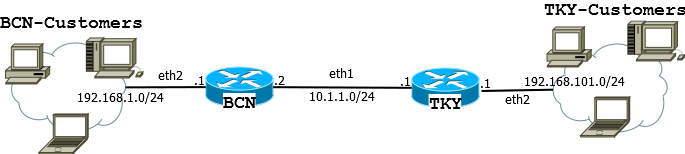
BGP diagram skeleton
This is the skeleton of our test-bed. We are going to set it up in a minute.
Quagga’s daemons of interest listen to the following ports: 2601 for Zebra and 2605 for BGP. You can access their CLI like this:
telnet localhost zebra
(alternatively telnet localhost 2601)
telnet localhost bgpd
(alternatively telnet localhost 2605)
Here is a basic config with 2 AS:
TKY |
BCN |
! Zebra configuration saved from vty ! 2015/10/29 23:44:17 ! hostname TKY password zebra ! interface eth0 description Serial0 link-detect ip address 10.0.2.14/24 ipv6 nd suppress-ra ! interface eth1 description toBCN link-detect ip address 10.1.1.1/24 ipv6 nd suppress-ra ! interface eth2 description CustomersTKY link-detect ip address 192.168.101.1/24 ipv6 nd suppress-ra ! interface lo description loopback ip address 1.1.1.1/32 ! router-id 1.1.1.1 ip forwarding ! ! line vty exec-timeout 22222 0 ! |
! Zebra configuration saved from vty ! 2015/10/29 23:46:39 ! hostname BCN password zebra ! interface eth0 description Serial0 link-detect ip address 10.0.2.15/24 ipv6 nd suppress-ra ! interface eth1 description toTKY link-detect ip address 10.1.1.2/24 ipv6 nd suppress-ra ! interface eth2 description CustomersBCN link-detect ip address 192.168.1.1/24 ipv6 nd suppress-ra ! interface lo description loopback ip address 2.2.2.2/32 ! router-id 2.2.2.2 ip forwarding ! ! line vty exec-timeout 22222 0 ! |
! Zebra configuration saved from vty ! 2015/10/29 23:52:42 ! hostname TKY password zebra log stdout ! router bgp 100 bgp router-id 1.1.1.1 network 192.168.101.0/24 redistribute kernel redistribute connected neighbor 10.1.1.2 remote-as 200 ! line vty exec-timeout 32768 0 ! |
! Zebra configuration saved from vty ! 2015/10/29 23:53:01 ! hostname BCN password zebra log stdout ! router bgp 200 bgp router-id 2.2.2.2 network 192.168.1.0/24 redistribute kernel redistribute connected neighbor 10.1.1.1 remote-as 100 ! line vty exec-timeout 32768 0 ! |
You can enter this configuration via CLI (command line interface) or just write it in the files zebra.conf and bgpd.conf and restart Quagga to apply them like this:
sudo /etc/init.d/quagga restart
The detailed diagram looks like this:
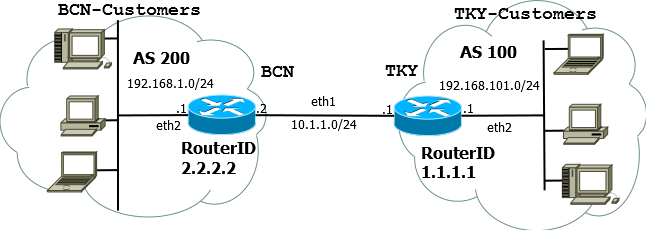
BGP Diagram, detailed
Tests.
Test 1: Simple ping test between TKY-Client and BCN-Client:
linux-qk59:/home/stoil # ping 192.168.1.2
PING 192.168.1.2 (192.168.1.2) 56(84) bytes of data.
64 bytes from 192.168.1.2: icmp_seq=1 ttl=62 time=2.26 ms
64 bytes from 192.168.1.2: icmp_seq=2 ttl=62 time=1.78 ms
64 bytes from 192.168.1.2: icmp_seq=3 ttl=62 time=2.24 ms
64 bytes from 192.168.1.2: icmp_seq=4 ttl=62 time=2.21 ms
64 bytes from 192.168.1.2: icmp_seq=5 ttl=62 time=0.847 ms
64 bytes from 192.168.1.2: icmp_seq=6 ttl=62 time=0.836 ms
^C
--- 192.168.1.2 ping statistics ---
6 packets transmitted, 6 received, 0% packet loss, time 5006ms
rtt min/avg/max/mdev = 0.836/1.697/2.264/0.626 ms
linux-qk59:/home/stoil #
Test 2: Simple traceroute between BCN-Client and TKY-Client:
linux-qk59:/home/stoil # traceroute 192.168.101.2
traceroute to 192.168.101.2 (192.168.101.2), 30 hops max, 60 byte packets
 1  192.168.1.1 (192.168.1.1)  0.247 ms  0.180 ms  0.142 ms
 2  10.1.1.1 (10.1.1.1)  1.442 ms  1.409 ms  1.301 ms
 3  192.168.101.2 (192.168.101.2)  1.632 ms  1.603 ms  1.765 ms
linux-qk59:/home/stoil #
Test 3: Copy a small file via ssh:
linux-qk59:~ # scp stoil@192.168.101.2:/home/stoil/Documents/Some*.txt .
Password:
SomeSmallFile.txt           100%    0     0.0KB/s   00:00
linux-qk59:~ #
Test 4: Copy large file via ssh:
linux-qk59:~ # scp SomeLargeFile.txt stoil@192.168.101.2:/home/stoil/Documents/
Password:
SomeLargeFile.txt                           100%   922MB  21.8MB/s   00:01
linux-qk59:~ #
Test 5: Sniff control plane traffic between BCN and TKY:
stoil@stoil-VirtualBox:~$ sudo tcpdump -i eth1 -w RouterDialog.pcap
 tcpdump: listening on eth1, link-type EN10MB (Ethernet), capture size 65535 bytes
 ^C12 packets captured
 12 packets received by filter
 0 packets dropped by kernel
 stoil@stoil-VirtualBox:~$
Have a look at this in WireShark:
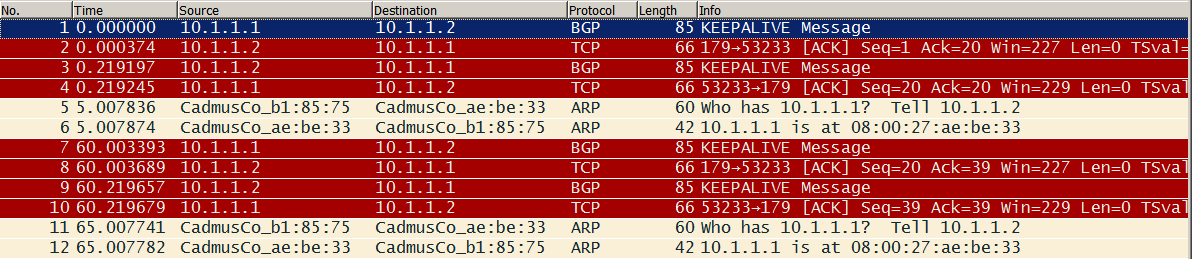
BGP keepalives in Wireshark
Test 6: Learned from BGP routes are inserted into kernel:
stoil@stoil-VirtualBox:~$ route -n
Kernel IP routing table
Destination     Gateway         Genmask         Flags Metric Ref    Use Iface
2.2.2.2         10.1.1.2        255.255.255.255 UGH   1      0        0 eth1
10.0.2.0        0.0.0.0         255.255.255.0   U     0      0        0 eth0
10.1.1.0        0.0.0.0         255.255.255.0   U     0      0        0 eth1
192.168.1.0     10.1.1.2        255.255.255.0   UG    0      0        0 eth1
192.168.101.0   0.0.0.0         255.255.255.0   U     0      0        0 eth2
stoil@stoil-VirtualBox:~$
Additional tests:
- Traffic loss during BGP route update.
- Latency and loss using Y.1731 and/or RFC2544.
- Line capacity.
[Unfortunately, for those you need a traffic generator and more sophisticated test equipment]
- Both routers in one AS. Just a small change in configuration. Then, repeat all tests above.
Pleasant hacking and I hope this article helped you.


